That “click” is the last judgment every machinist wants to hear.
Imagine: a nearly finished, valuable workpiece sits in front of you. You’re holding your breath, tapping the last blind hole. There’s a familiar resistance at your fingertips, and victory is in sight. …… Suddenly, the resistance increases! And then – “click” a crunch. Time seems to be frozen, the heart sank to the bottom: tap, broken in the depths of the hole.
This moment is a nightmare that lingers in the workshop. What followed was a surge of frustration and the loss of precious time – to carefully wrestle with the stubborn broken cone, or to painfully declare the entire workpiece obsolete? The price is always so high.
And the root of this nightmare is often not pure bad luck. The truth is that most blind hole tapping tragedies begin with a critical selection error – using the wrong tap in the wrong situation.
Blind hole tapping, in particular, leaves nothing to chance. In a limited space, the tap is subjected to so much squeezing pressure and torque that a poor choice is tantamount to a hidden danger. The good news is that it’s completely avoidable! Understanding the core differences between a Bottoming Tap and a Taper Tap is the key to meeting the challenge of blind holes with precision and saying goodbye to that “click” sound.
So which is faster and safer to clear a blind hole that must be tapped to the bottom? The “bottom hole tap” designed for the bottom of a blind hole, or the “tapered tap” with its progressive guidance? The answer will determine your efficiency and the fate of your workpiece.
To save you time, here is a quick overview of the core conclusions.
Quick Reference: Choose Your Tap at a Glance
| Tap Type | Primary Use | Key Feature |
|---|---|---|
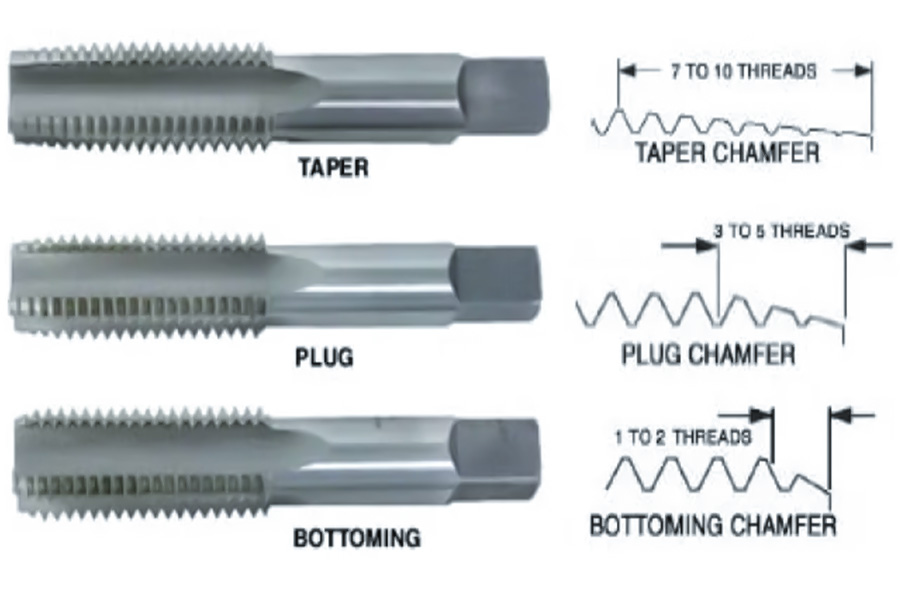
| Taper Tap | Starting | 7-10 turns of cutting taper, easy to align, low cutting force |
| Plug Tap | Advancing | 3-5 turns of cutting taper, the main force for blind holes and through holes |
| Bottoming Tap | Finishing | 1-2 turns of cutting taper, tapping the thread to the bottom of the hole |
This guide will dive into every detail. We’ll go beyond simple definitions to provide you with a clear decision framework, expert hands-on tips, and real-life examples from our CNC shop. By the end of this article, you’ll have the confidence to choose the right tool for any project and make “broken taps” a thing of the past.
Here’s What You’ll Learn
- A simple decision-making framework to help you lock in the right tap type for your project in under 60 seconds.
- The key differences in the design of the three taps and why they are critical to cutting forces, alignment, and thread quality.
- A professional three-step process for conquering demanding blind hole threads, ensuring perfect results every time.
- Real case studies from our LS CNC machine shop showing how theory works in practice.
- Answers to frequently asked questions (FAQs) that sometimes confuse even experienced machinists.
Now, let’s dive in and become a true tapping expert.
Why should you trust this guide? Practical experience from LS CNC machining experts
I’m and I’ve been with LS for over 15 years. Our shop is not a clean lab, but a real battlefield where we fight every day against high-strength alloys, tight tolerances and complex geometries.
Here, we don’t just “know” the difference between a Taper, a Plug, and a Bottoming tap, we depend on that knowledge to survive.
- We make parts for aerospace customers where thread failure could mean catastrophic consequences.
- We machine implants for the medical device industry where the accuracy of the threads is directly related to the health of the patient.
- The engine components we produce for high-performance automobiles have threads whose strength determines reliability at the limit of performance.
Over the past decade, our team has successfully delivered more than [50,000+] custom CNC machining parts with precision threads. Each part has taught us something: which tap performs best on 316 stainless steel, how to adjust the parameters of a CNC program to optimize the tapping process on titanium, and how to balance efficiency and quality when faced with high volume production.
Every suggestion, every tip in this guide stems from our countless successes (and some costly failures early on). We’ve stepped in the potholes so that you don’t have to. What we share is not theory copied from a textbook, but real-world experience verified by oil, swarf and rigorous quality testing.
So be confident that what you read here is exactly the kind of knowledge we use every day. Let’s do things right together.
Correct tapping process: This is not a duel, but a relay race
“Forget ‘who’s faster.’ The right question is: ‘What are the correct steps to complete a perfect blind hole?’ The answer is a carefully choreographed three-step relay.”
Tapping Relay Race Process Summary Table (Applicable to Blind Holes)
| Baton Relay | Type of Tap (Role) | Core Tasks | Why Relay? (Key Reasons) | Absolute No-No’s |
|---|---|---|---|---|
| First stick | Taper tap (leader) | Safe threading & establishing initial trajectory | Avoid deflection/breakage: Long taper disperses initial cutting force to ensure vertical entry into the hole. Direct use of other taps will fail due to excessive initial contact force. | None (must start) |
| Second stick | Second tapping tap (backbone) | Complete main cutting & expand depth | Efficiency and depth: Efficient cutting on a safe trajectory, machining threads close to the bottom of the hole, leaving space for the end stick. Share the main load and protect the end stick. | Directly used for threading or hole bottom finishing |
| Third stick | Bottom tapping tap (terminator) | Hole bottom finishing & full thread depth | The only way to reach the bottom of the hole: The extremely short taper can reach the bottom of the hole, complete the last 1-2 turns of thread, and ensure that the bolt is screwed to the bottom. | Only slight cutting force is required. Do not use for threading or main cutting! (must break) |
Strike 1: Taper Tap – Lead Runner
The task:
- Safe Guidance & Precise Thread Start: As the starting point of the process, the core task is to safely and vertically guide the tap into the pre-drilled hole and cut the first few complete turns of thread.
- Establishment of the datum: Using its long taper (usually covering 7-10 teeth), the tap cuts slowly and progressively into the material at the hole opening, gradually forming the initial thread profile. This initial thread path must be as vertical and centered as possible to provide accurate guidance for subsequent taps.
- Reduced Initial Cutting Resistance: The long taper design allows for a very small amount of material to be cut at a time, significantly reducing cutting torque and lateral forces.
Why does it relay?
- Avoid catastrophic failure: This is the most critical first leg of the relay. If a Plug Tap is used directly, especially a Bottoming Tap, its short taper or almost flat-bottomed shape results in the front end of the tap instantly making large contact with the hole wall. This generates large cutting forces and severe torque impacts.
- Prevents deflection and breakage: The large initial contact force can easily cause the tap to deflect (tap crooked) in the hole, or break directly in the hole due to instantaneous overload. The long taper of a taper tap acts as a precision guide cone, dispersing strong concentrated forces into small, gradual ones, greatly reducing the risk of deflection and breakage.
- Lays the foundation for perpendicularity: It ensures that the entire threading process is built on a perpendicular, centered foundation from the start, and that subsequent taps simply follow the trajectory it opens up. Without it, the quality and success of subsequent steps would be difficult to guarantee.
Stick 2: Plug Tap – The Stalwart
The task:
- Deep Cutting and Thread Forming: After the taper tap has successfully opened up the “runway”, the Plug Tap takes over the main cutting work. With its moderate cutting cone length (usually covering 3-5 teeth), it is able to machine effective threads deeper than the taper tap.
- Finishing through holes or deeper for blind holes: For through holes, the 2-tap tap is usually able to finish the entire threading process from inlet to outlet in a single pass, and it is the workhorse as well as the finisher. For blind holes, its job is to deepen the threads close to the bottom of the hole (leaving room for the last few threads) in preparation for the final finish of the bottom tapping tap.
- Widening and deepening of the thread profile: Building on the foundation established by the taper tap, it further widens and deepens the thread profile to near final size and depth requirements.
Why Relay?
- Balance of Efficiency and Capacity: While taper taps are precise in their guidance, their long taper also means that they are not as efficient in machining deep threads and cannot be machined near the bottom of the hole. The short taper design of the second tapping tap allows it to cut more material more efficiently and extend threads into deeper areas while maintaining better guidance (relying on the trajectory established by the first bar).
- Paving the way for the final bar: In blind hole machining, it is responsible for doing the vast majority (about 80-90%) of the cutting, machining the thread depth to just the last 1.5-3 pitches from the bottom of the hole. This creates an ideal, easy-to-finish environment for bottom tapping taps (whose flat-bottomed design can’t start threads on its own or take a lot of cutting). Without its catch, the bottom tapping tap will not work effectively or face excessive resistance.
- Avoid overconsumption of the bottom tapping tap: If you try to machine too deep a thread directly with the bottom tapping tap, its short cutting edge will be subjected to tremendous, constant cutting forces and will wear out or even chip or break easily. The second tapping tap shares the main load.
Stick 3: Bottoming Tap – The Terminator
The task:
- Bottom finishing and perfect finish: In the final stage of blind hole tapping, the sole task of the Bottoming Tap is to clean, finish and complete the last 1-2 turns (usually 1.5-3 pitches) of the hole bottom with a full thread.
- Achieving full thread depth: Its design features a very short cutting cone (maybe only 1-1.5 threads), even nearly flat bottomed (but still with a slight introduction angle), which allows its cutting edge to be as close as possible to the flat bottom of the blind hole.
- Ensure bolts go all the way to the bottom: By accurately machining the last few threads on the bottom of the hole, it ensures that the bolt or screw will screw in smoothly and be fully seated on the bottom of the hole, realizing the designed assembly requirements.
Why Relay?
- An irreplaceable “finisher”: The long taper of the Plug Tap prevents the cutting edge from extending very close to the bottom of the hole. In blind holes, an unmachined or incompletely formed thread remains near the bottom of the hole after the Plug Tap is used. Only the extremely short cutting cone design of the bottom tapping tap can effectively reach and finish these last critical few threads.
- Extremely Low Cutting Loads: When relaying to the bottom tapping cone, the majority of the threads in the hole have already been completed by the first two rods, leaving only a very small amount of material to be removed from the bottom of the hole. This allows the bottom tapping tap to be subjected to very light cutting forces, primarily for finishing and alignment.
- Absolute warning – Do not use for starting or major cutting:: This is the last tap of the relay race. If it is used incorrectly to start a tooth (first stroke) or to make a major cut (second stroke), its short cutting edge is instantly subjected to a huge, concentrated cutting force. This will almost certainly result in the tap immediately seizing, chipping or breaking in the hole, causing the workpiece to be scrapped. Its existence and value depend entirely on the foundation successfully laid by the first two rods.
Blind hole tapping is a precise relay: the taper tap is used to safely start the thread; the second tapping tap is used to efficiently cut and deepen the thread; the bottom tapping tap is used to fine-tune the bottom of the hole. Strictly following this sequence of relays is the key to efficiently and safely processing perfect threads and preventing wire breakage. (Through holes usually only require a second tapping tap)
In-depth analysis: The identity profile of the “Tap Brothers”
In the tapping process, especially when machining demanding blind holes, three specific types of taps are usually used, which are often referred to as the “three brothers of taps”. These three taps are not simply substitutes, but play an irreplaceable and specific role in the tapping process based on their unique structural design (the core difference lies in the length and shape of the cutting cone). Understanding their identities and differences is the key to mastering the correct tapping process.
To save you time, here is a quick overview of the core conclusions.
Summary table of the core differences between the “Tap Brothers”:
| Features | Taper tap (first tap) | Plug tap (second tap) | Bottom tap (final tapping tap) |
|---|---|---|---|
| Core role | Safe threading guide | Main cutting executor | Hole bottom finishing finisher |
| Cutting taper length | Longest (7-10 teeth) | Medium (3-5 teeth) | Very short (1-2 teeth) |
| Front end shape | Long taper | Medium taper | Almost flat bottom |
| Main use | Safe and vertical threading in open holes | Efficient cutting of most threads; through hole finishing | Only finishing the last 1-2 threads at the bottom of the blind hole |
| Key advantages | Best guidance, safest threading | High efficiency, strong versatility | The only one that can reach and process the bottom thread of the hole |
| Fatal taboos | None | Avoid using it alone to finish the bottom of deep blind holes | Absolutely forbidden to use it for threading or main cutting! |
| Application range | The first step in blind hole tapping | The only one required for through holes; the middle step of blind holes | Only the last step in blind hole tapping |
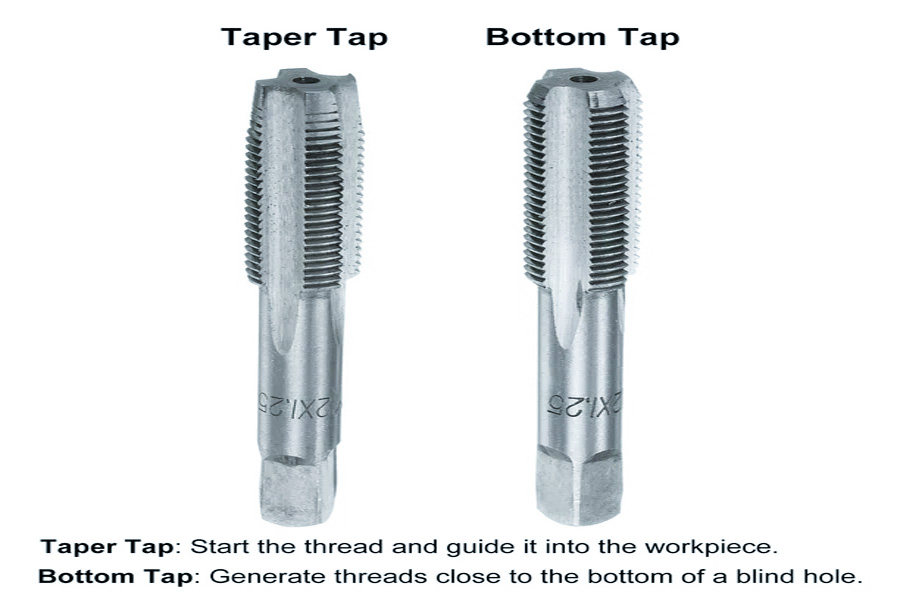
1. Taper tap – also known as “first tap” or “starting tap”
Identity and features:
- It is the first baton in the tapping relay race, responsible for safe threading.
- The most notable structural feature: It has a long cutting cone, usually containing 7 to 10 chamfered teeth. This long tapered front end is its core identity.
Interpretation of core uses:
- Core task: Safely and vertically cut into the material in a newly drilled hole (bare hole) without any threads, and establish the initial and correct thread trajectory.
- Why it? Its progressive long taper design minimizes the amount of material cut each time. This brings huge advantages:
Minimized cutting force: Greatly reduces the initial cutting torque and lateral force.
Optimal guidance: The long taper can more effectively guide and center the tap, minimizing the deflection (tapping) of the tap at the hole mouth.
Highest safety: The extremely low initial cutting force and good guidance make it the choice with the lowest risk of breakage in the threading stage. Directly using other types of taps (especially bottom tapping taps) to start the thread is one of the most common mistakes that lead to early breakage of the tap.
It is an expert in safe threading, relying on long tapers to achieve soft cutting and precise guidance, laying a solid foundation for the entire tapping process. Without its “leadership”, the risks of subsequent steps will increase dramatically.
2. Plug tap – also known as “second tap” or “intermediate tap”
Identity and characteristics:
- It is the second stick in the tapping relay race, and bears the heavy responsibility of main cutting.
- The most notable structural feature: The cutting cone is of moderate length, usually containing 3 to 5 chamfered teeth. Its front taper is steeper than that of a tapered tap, but much gentler than that of a bottom tapping tap.
- The most widely used: This is the most versatile and frequently used of the three taps.
Interpretation of core uses:
- Core tasks: After the tapered tap successfully establishes the initial thread trajectory, the plug tap relays most of the thread cutting work, extending the thread to a deeper area.
- Why it?
Balance of efficiency and capability: Compared with the long taper of the tapered tap, its shorter taper allows for greater and faster material removal rates, significantly improving processing efficiency. At the same time, its taper can still provide sufficient guidance (depending on the path opened by the first stick).
First choice for through holes: For through holes that go through the entire workpiece, the plug tap is usually the only tap needed to complete the entire threading process due to its efficiency and sufficient cutting depth capability. It can be tapped from one end of the hole, and the thread naturally emerges from the other end.
Key intermediate step for blind holes: It is an indispensable “backbone” in blind hole tapping. It is responsible for advancing the thread cutting to a position close to the bottom of the hole based on the tapered tap (usually reserving the last 1.5-3 pitches for the final depth) to prepare for the final finishing of the bottom tapping tap. Attempting to directly process too deep threads with the bottom tapping tap will break due to excessive resistance.
It is the workhorse of efficient cutting, balancing cutting efficiency and guidance. It is the terminator of through hole tapping and the key link between the upper and lower parts of the blind hole tapping process.
3. Bottom tap – also known as “flat bottom tap” or “final tapping tap”
Identity and characteristics:
It is the third baton in the tapping relay race, dedicated to the perfect finish.
The most notable structural feature: It has an extremely short cutting cone, usually only 1 to 2 chamfered teeth, and its front end is almost flat. This is the most core and eye-catching mark that distinguishes it from the first two.
Interpretation of core uses:
- Core tasks: In blind hole tapping, when the plug tap has processed the thread close to the bottom of the hole, the only responsibility of the bottom tap is to clean, trim and finally complete the last few turns (usually 1-2 turns) of the complete thread at the bottom of the hole.
- Why it?
The ability to reach the bottom of the hole: Its nearly flat bottom design and extremely short cutting cone enable its cutting edge to be as close to the flat bottom of the blind hole as possible. This is absolutely impossible for tapered taps and plug taps due to their taper length.
Finishing rather than heavy cutting: It is not a tool for heavy cutting tasks! When it comes on the scene, most of the material in the hole (about 90%) has been removed by the first two rods, and it only needs very light cutting force for final finishing and calibration.
Achieve full thread depth: Only it can ensure that the bolt or screw can be screwed in smoothly and completely seated at the bottom of the blind hole to achieve the assembly effect required by the design.
Key warning:
Absolutely forbidden to use it for threading or main cutting! This is the iron rule of using bottom taps. If you try to use it for threading (the first rod task) or deep threading (the second rod task), due to its extremely small cutting angle and contact area, it will immediately be subjected to huge and undispersed cutting forces, which will almost inevitably lead to instant jamming, chipping or breakage. It is completely dependent on the working conditions created for it by the first two rods (especially the plug tap).
It is the exclusive terminator of blind hole tapping, relying on its unique flat bottom design to reach and finish the last few threads at the bottom of the hole. Its value is huge, but the conditions for use are extremely strict-it can only be used as the last step of the relay race for micro-finishing.
Understanding and respecting the unique identities, structural characteristics and exclusive uses of the “three tap brothers” and using them strictly in the order of “taper -> plug -> bottom tap” are the core principles for completing blind hole thread processing efficiently, safely and with high quality.
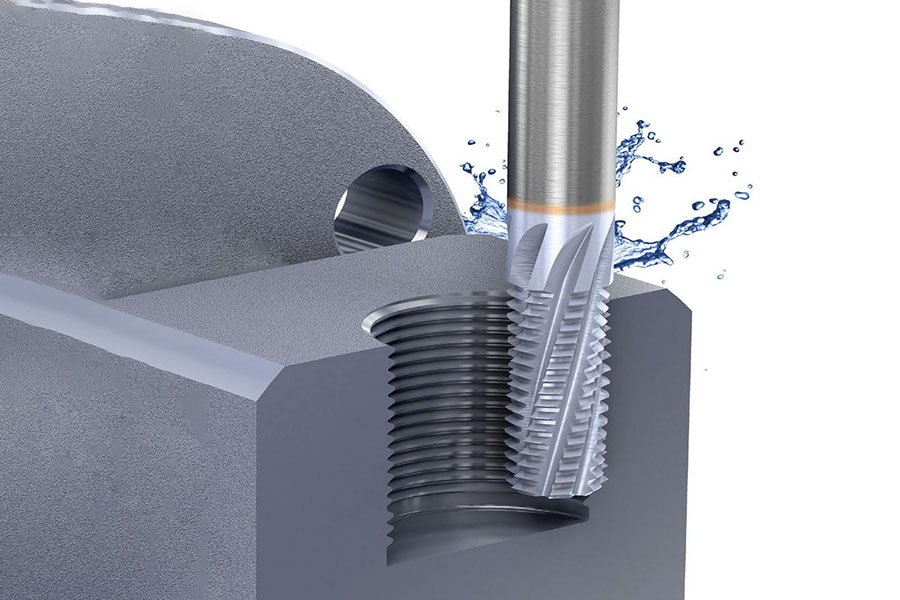
Practical case analysis: Machining M6 blind holes for high-precision sensor bases
Theory must be applied in practice. Here is how we at LS perform textbook blind hole tapping for a real CNC machined part.
- Project Challenge: The customer needs to machine a 15mm deep M6 blind hole on a 6061 aluminum alloy sensor base, and the effective thread depth must reach 14mm.
- Wrong approach: If the operator uses a bottom tap directly for the sake of “speed”, it is likely to break after entering 2mm due to excessive cutting force, causing the entire part to be scrapped.
Our professional process: three-step relay, precise control
After strictly following the process specifications and machine tool debugging, perform the following standardized operations:
Preparation: Lay the foundation
- Use Ø5.0mm carbide drill (M6 standard bottom hole) to drill blind holes in the CNC machining center to a depth of >16mm (reserve 1mm chip removal space to avoid iron chips squeezing the bottom of the hole).
- Key details: Immediately after drilling, use a high-pressure air gun + a special hole bottom cleaning hook to remove aluminum chips to ensure that the bottom of the hole is clean and free of residue.
Step 1 (foundation of starting teeth): Taper tap leads
- Select M6 taper tap (Taper Tap) and use water-soluble cutting fluid for continuous lubrication.
- Operation points:
- CNC rigid tapping mode, speed 800 RPM, feed 800 mm/min (1:1 pitch synchronization).
- Depth control: Accurately tap 5mm (about 5 complete threads) to establish a vertical, coaxial thread guide trajectory.
- Value: Long taper disperses cutting force, taps are smoothly introduced, and deflection and tooth collapse are eliminated from the root.
Step 2 (deep attack): The main force of the tapping tap is pushed forward
- Replace the M6 tapping tap (Plug Tap) and maintain the same cutting fluid and speed.
- Operation points:
- Continuously cut to a depth of 12mm along the path opened by the taper tap (2mm reserved from the target depth).
- Process monitoring: The CNC system detects torque in real time and automatically alarms for abnormal fluctuations (preventing chip blockage or material defects).
- Value: 3-5 tooth taper balances efficiency and guidance, efficiently removes 90% of the material, and creates a low resistance environment for the final attack.
Step 3 (fine finishing): Perfect end of the bottom tapping tap
- Switch to the M6 bottom tapping tap (Bottoming Tap), and the speed drops to 300 RPM (fine control).
- Key points of operation:
- Manual mode + torque protection chuck (or CNC micro-feed mode), feel the cutting status by hand + sound.
- Screw in slowly, and when the tap contacts the reserved area at the bottom of the hole, gently “jog” to clean the last 1.5-2 teeth.
- After tapping to 14mm effective thread depth, immediately reverse and exit (avoid scratching the thread).
3.Value: Ultra-short taper accurately polishes the bottom thread of the hole to ensure that the bolt can be fully screwed into the designed stop surface.
Result: Victory of textbook-level accuracy
Quality verification:
Use thread go/no-go gauge to detect: the go gauge is smoothly screwed into 14mm deep, and the stop gauge rejection position meets ISO standards.
Endoscopic inspection: The bottom thread of the hole is clear and complete, without burrs or extrusion deformation.
Customer value:
100% qualified rate delivery of key sensor bases to ensure zero delays in customer production line assembly.
Cost-effectiveness: Avoid single-piece scrap losses (material + remake hours ≥ ¥500) and avoid batch risks.
This case illustrates the core competitiveness of precision manufacturing technology – deeply integrating classical process theory with CNC precision, replacing luck with rigorous processes, and allowing the “tap relay race” to end perfectly in every blind hole.
Frequently Asked Questions (FAQ) – Answers to all your questions about tapping
1. What is the difference between a bottom tap and a double tap?
The core difference between the two lies in the length of the cutting cone and the functional positioning. The double tap has a medium-length cutting cone with 3-5 teeth, which is the main force in the tapping process and is responsible for completing most of the thread cutting work; while the bottom tap has an ultra-short cutting cone with only 1-2 teeth, which is specially used for finishing the last few threads at the bottom of the blind hole. It must be used after the first two taps have completed basic processing. Direct use for threading will cause the tap to break.
2. What is “first tap, second tap, bottom tap”?
This is the traditional name system for the standard tapping three-piece set. The first tap is the taper tap, which is responsible for safe threading; the second tap is the double tap tap, which undertakes the main cutting task; the bottom tap is the bottom tap tap, which is specially used for the finishing work at the bottom of the blind hole. The three must be used strictly in order, just like the order of the baton in a relay race.
3. Can I buy only one bottom tap set?
This practice is highly not recommended. The bottom tap is like the last baton in a relay race. Without the foundation of the first two batons (taper and two-tap tap), it cannot function independently. Professional processing must be equipped with a complete three-piece set. The bottom tap set alone not only cannot complete blind hole processing, but also easily causes tool damage and workpiece scrapping due to incorrect use.
4. What is bottom tapping?
Bottom tapping refers specifically to blind holes with threads processed almost close to the bottom of the hole, and usually requires the bolt to be completely screwed to the bottom. The last 1-2 turns of thread in this type of hole must be processed using a special bottom tap. Ordinary taps cannot reach the bottom area of the hole due to their taper design. It is a common high-demand thread form in precision assembly.
Conclusion
In precision machining, there is no “bottom tap vs. taper tap”. There is only professional collaboration that follows the golden rule of “taper hole -> plug hole -> bottom tap”. Speed comes from the correctness of the process, not the performance of a single tool.
If you are tired of the risks and costs brought by uncertainty and want CNC machining to ensure the accuracy of every threaded hole on the part, then leave this task to the experts. Contact LS now, upload your drawings, and let us use professional processes and technologies to provide you with reliable and cost-effective CNC machining services!
 📞 Phone: +86 185 6675 9667
📧 Email: info@longshengmfg.com
🌐 Website: https://www.longshengmfg.com/
Disclaimer
The content appearing on this webpage is for informational purposes only. LS makes no representation or warranty of any kind, be it expressed or implied, as to the accuracy, completeness, or validity of the information. Any performance parameters, geometric tolerances, specific design features, quality and types of materials, or processes should not be inferred to represent what will be delivered by third-party suppliers or manufacturers through LS’s network. Buyers seeking quotes for parts are responsible for defining the specific requirements for those parts. Please contact to our for more information.
Team LS
This article was written by various LS contributors. LS is a leading resource on manufacturing with CNC machining, sheet metal fabrication, 3D printing, injection molding,metal stamping and more.