Do you have a wonderful design in mind? It may be a futuristic home decoration, a custom light box to display treasures, or a commercial display prototype that needs to stand out. To realize it, you set your sights on shiny, modern acrylic – this material is as transparent as crystal, tough and light, and is the best choice to light up your creativity.
However, when you are ready to get started, a seemingly basic but extremely critical question lies before you: “How do you cut this beautiful acrylic sheet?!” Whether it is a whim of DIY enthusiasts or prototype creation in the professional field, precise and clean cutting of acrylic is the first step to turn the blueprint into a physical object, but it is also the link that is most likely to make people “turn over”.
The pain point is here: acrylic, although it has an elegant glass-like appearance, is essentially a plastic. This determines that it is not a material that can be easily handled by “hard hitting”. The wrong tools or methods can cause the edges to melt or become rough (collapsed edges), or even cause the board to crack or become scrapped, instantly extinguishing your creative enthusiasm. There are all kinds of “little tricks” circulating on the Internet – saw blades, utility knives, and even heated wires… It sounds simple, but which one is really safe, efficient, and can cut the professional-grade smooth edges you need?
Don’t let cutting become a stumbling block to your creativity! Next, let’s take a deeper look at how to choose and master the most suitable acrylic cutting method based on your project requirements, tool conditions, and desired results.
Acrylic Sheet Cutting Method Comparison Table
| Cutting Method | Best for Thickness | Pros | Cons |
|---|---|---|---|
| Scribing & Breaking | < 3mm (1/8″) | Simple tools (utility knife/special hook knife), low cost, relatively easy to operate | Only for straight line cutting, rough edges, easy to crack, not suitable for complex shapes, requires practice to master strength, strict thickness restrictions |
| Sawing | 3mm – 25mm (about 1/8″ – 1″) | Fast speed, suitable for straight lines and simple curves, relatively popular tools (ordinary saw plus special saw blade) | Requires special plastic saw blade, easy to melt (produces slag), loud noise, requires a lot of grinding on the edge, produces plastic debris, limited curve accuracy |
| Laser Cutting | Almost all thicknesses (upper limit of about 50mm, depending on the power of the equipment) | Extremely high accuracy, mirror-like edges (flame polishing effect), can cut any complex shape, narrow incision (small material loss), high degree of automation | Requires specialized and expensive equipment, has high operating costs, produces hazardous gases and fumes (strong exhaust is required), and the type of materials may be limited (e.g., chlorinated plastics are not suitable) |
Here’s What You’ll Learn:
- The cornerstone of safety and precision: Key preparation steps before cutting to ensure safe operation and get a precise starting point.
- Thin plate straight line cutting solution: Master the core operation and common reasons for failure of the “marking and breaking method” to easily separate thin plates below 3mm.
- Thick plate and curve cutting tool: Learn how to correctly select saws and saw blades, as well as key cooling techniques to deal with thicker plates and simple curves.
- The ultimate solution for complex cutting: Uncover why laser cutting can achieve unparalleled precision, perfect flame polished edges, and the ability to handle any complex shape.
- Completely avoid the risk of cracking: Insight into the root cause of acrylic cracking caused by DIY methods, and master the only cutting method that can 100% avoid micro cracks.
- Customized chassis side transparent panel practical analysis: Through a real case analysis, compare the DIY dilemma and how laser cutting can perfectly achieve complex hollowing and fine logos.
- Frequently Asked Questions About Cutting Acrylic: Answers to key questions about tool selection, laser odor, cost-effectiveness, and material suitability.
Now, let’s dive into the mysteries of each method to find the perfect cutting solution for your custom acrylic project.
Preparation: Safety First, Measure Twice
| Core principles | Key measures | Specific operations/purposes |
|---|---|---|
| Safety first | Wear goggles | Required! Any operation (including marking) may generate flying debris, so eye protection is essential. |
| Wear gloves | Prevent cuts from the edge of the plate or tools during handling, fixing and processing. | |
| Secure the workpiece | Use a clamp to firmly fix the acrylic plate on the workbench throughout the process to prevent accidents caused by sliding during cutting/processing. | |
| Protect the workpiece | Keep the protective film | Do not remove the protective film in advance before completing all cutting and processing steps to effectively prevent surface scratches. |
| Measurement second | Accurate marking | Use a marker or fine-tip pencil to draw the cutting line clearly and accurately on the protective film. |
1. Protective Equipment
- Goggles are needed: Drilling, grinding, cutting, or even marking acrylic may generate minute particles or debris at high velocities that easily result in eye damage. They should be worn throughout the procedure.
- Gloves are recommended: They are used primarily to protect against cuts due to the sharp edges while working, fixing the board and on the edges after cutting. Use cut-resistant gloves that will not sacrifice functional flexibility.
2. Repairing the workpiece:
- Hold securely by clamping: Any movement of the board during processing will lead to incorrect cutting, tool slipping, or even physical harm. Use a sufficient number and size of clamps (G-clamps, F-clamps) to hold the acrylic board securely fixed down to the worktop on all four sides.
- Do not remove the film until processing is complete: The acrylic board is highly susceptible to scratching. The protection cover film is a perfect shield. Ensure to keep in mind removing protective film after completion of all process activities such as cutting, drilling, and grinding.
3. Correct Marking
- Mark on the surface of the protective film strongly. For example, by using the marker pen (oil-based, non-smudgeable) or sharp pencil, mark the cutting line or positioning point needed. A clearly marked spot on the protective film will not be devastated and can protect the sheet underneath.
Right preparation is the key to proper acrylic processing. Never underestimate the importance of putting: safety first (glasses, gloves, and secure fixation), protection second (unbroken protective film), and precision third (correct labeling). Most accidents are induced by poor preparation. Measurements can be re-taken, but never compromising safety.
DIY Method 1: The Scribe & Snap Method
| Features | Description |
|---|---|
| Applicable scenarios | Only suitable for straight-line cutting of thin acrylic plates below 3mm. |
| Required tools | Main tool: Sharp utility knife or special acrylic hook knife (Acrylic Cutting Tool) Auxiliary tools: Sturdy ruler or angle square, workbench (with straight edge) |
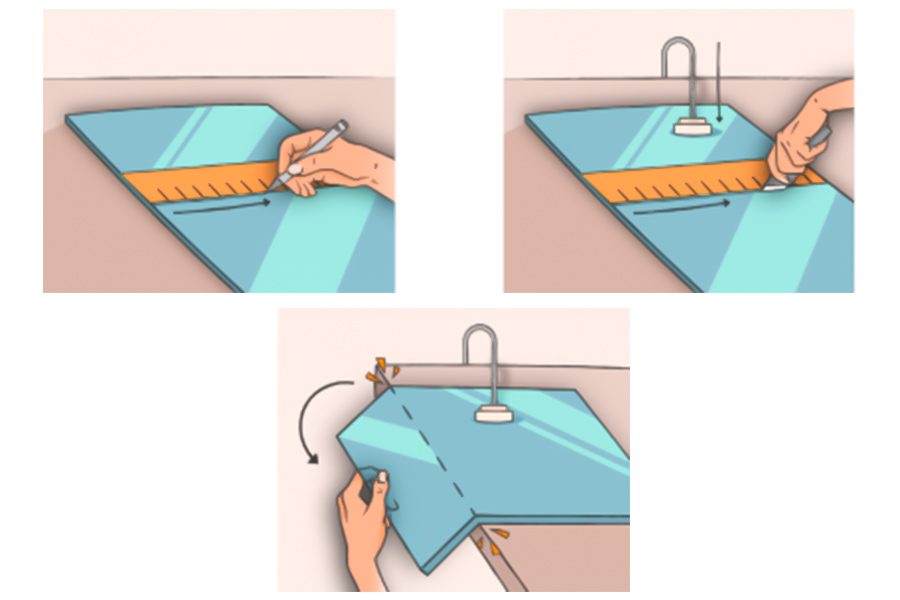
| Key steps | 1. Ruler positioning and marking 2. Repeat marking to 1/3-1/2 of the thickness of the plate 3. Align the scratches to the edge of the workbench 4. Press and hold + break quickly with force |
| Common problems | Plate cracking: Usually caused by insufficient scratch depth or hesitation and uneven force when breaking. |
1. Steps:
(3) Edge alignment: Then, edge the sheet along the workbench edge with great caution. The scratch line should be evenly aligned with the flat, hard surface of the workbench. The score line should be held entirely over the edge of the workbench.
- With one hand firmly holding the sheet on the workbench.
- The other hand breaks or strikes the end of the hanging piece sharply, clearly, and forcefully. The stroke should be sharp and clear.
2.Analysis of Common Problems
- Lack of depth of score: Most common reason. Depth less than 1/3 thickness of sheet and this is not enough to provide a satisfactory stress concentration line.
- Uncertain or irregular breaking force: Slow- or irregular-breaking force or repeated attempts will cause the crack to grow unrestrained. It must be broken suddenly. Abruptly.
- The score line is not exactly at the edge of the table: The supporting point is shifted, and therefore an inhomogeneous distribution of the stress.
- The sheet is not pressed/fixed firmly: The sheet shifts during operation.
- (Remarkably less frequently) The sheet itself harbors internal stress or faults.
The scratch and break process is a low-tool, low-cost technique based on the utilization of deep scratches to control stress concentration in cutting thin acrylic sheets into straight lines. Its success relies on controlling the scratch depth (1/3-1/2 sheet thickness) and employing a hard, rapid, and forceful breaking action.
DIY Method 2: Saw Cutting
| Key elements | Description/options | Important tips/notes |
|---|---|---|
| Applicable scenarios | • Thicker acrylic board • Simple curve cutting |
|
| Key points | Saw blade selection | Must use fine-toothed saw blades designed for plastic/acrylic! |
| • Many teeth and fine tooth shape | • Reduce friction heat and prevent melting • Absolutely no woodworking saw blades! |
|
| Optional tools | 1. Jigsaw | • Slow and stable feed speed • Best for curves and special shapes |
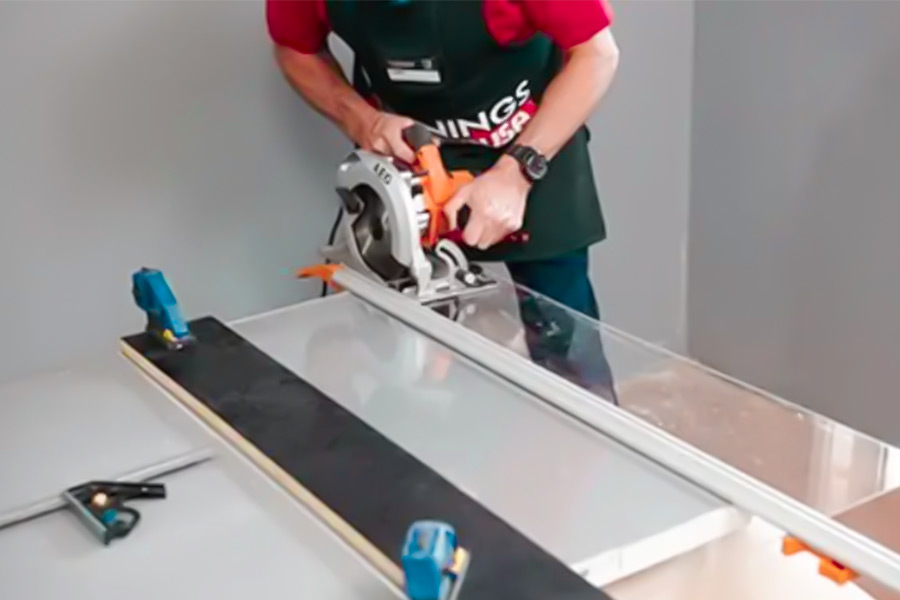
| 2. Table Saw/Circular Saw | • Suitable for fast, straight and long-distance cutting • Make sure the saw blade type is correct |
|
| Cooling methods | • Water spray • Use cutting fluid |
Effectively reduce the temperature of the cutting area to prevent acrylic from overheating, melting and sticking |
| Post-processing requirements | • Grinding | The edges will inevitably be rough after cutting, and grinding is required to obtain a smooth and flat effect |
- Must: Finer plastic/acrylic saw blades (many closely spaced teeth). This can significantly reduce friction heat.
- Forbidden absolutely: Never employ circular saw blades for woodworking! It will generate too much heat and cause melting, sticking, and smoking, which is extremely dangerous and wasteful.
- Jigsaw: Initial go-to choice for curving cutting. It must be fed slowly at a regular, low, and consistent pace, and the workpiece must be clamped.
- Table saw/circular saw: Straight long cuts are most efficient. Circular saws require guide rails, and table saws need a backing. There also requires special saw blades to move smoothly.
Briefly, the key is to choose a specific fine-tooth saw blade, control speed and heat, and grind well, thereby cutting acrylic effectively and safely.
The Ultimate Solution: Laser Cutting
When traditional acrylic processing methods encounter bottlenecks in precision, complexity and finished product quality, laser cutting technology stands out with its revolutionary advantages and becomes the ultimate solution for modern precision acrylic processing.
Overview of the core advantages of laser cutting acrylic:
| Core advantages | Specific performance |
|---|---|
| Unparalleled precision | Error control is at the micron level, far exceeding the limits of manual or traditional mechanical processing. |
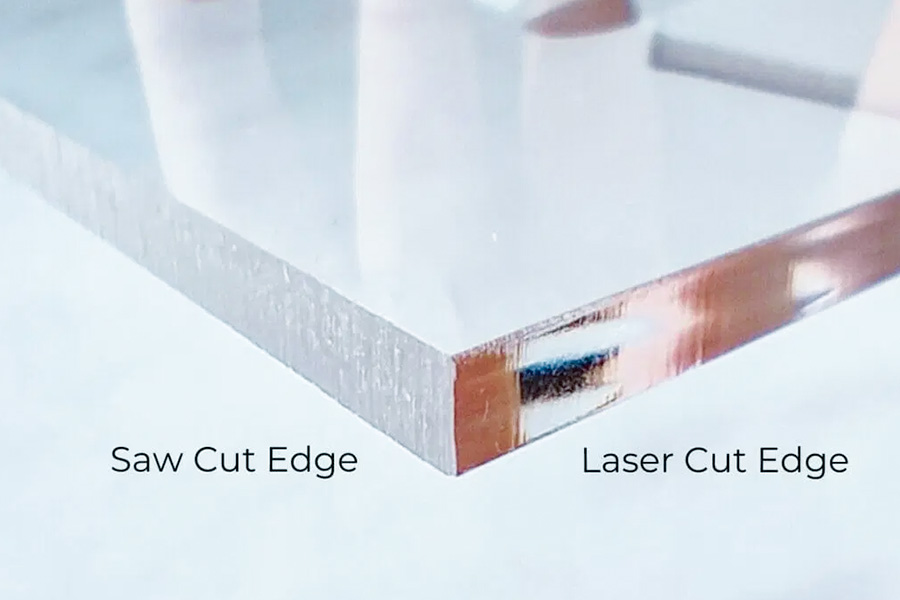
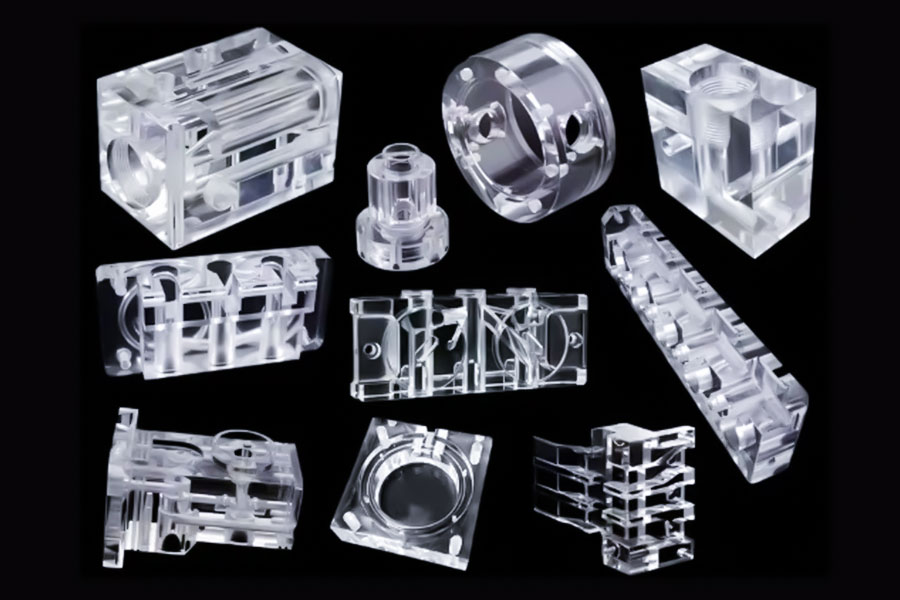
| Perfect edge | Cutting results in a “flame polishing” effect, with smooth and transparent edges without additional grinding or polishing. |
| Infinite complexity | Completely driven by digital design (CAD files), it can accurately realize any complex graphics, fine text and hollow patterns. |
| No stress, no cracking | Non-contact processing avoids mechanical stress and completely eliminates the risk of acrylic cracking during processing. |
1. Unparalleled precision:
Computer precision control: The software (CAD file) accurately guides the movement path of the high-energy focused laser beam.
Micron-level error: The cutting accuracy is far beyond manual operation or traditional mechanical processing (such as sawing, CNC milling), and the error can be controlled at the micron level.
Perfect size reproduction: Ensure the perfect realization of complex designs and high-precision parts (such as precision models, components with strict dimensional requirements).
2. Perfect edge (flame polishing effect):
Thermal effect polishing: The laser instantly vaporizes the material at high temperature, melts and quickly re-solidifies the cutting edge.
Smooth and transparent: Form a smooth, clear and transparent crystal edge like a professional polishing.
Zero post-processing: The ideal edge that can be used directly after cutting is completed, eliminating additional processes such as grinding, mechanical polishing or flame polishing, improving efficiency and aesthetics.
3. Unlimited complexity:
CAD-driven: The processing capacity depends entirely on the complexity of the digital design (CAD file).
Break through physical limitations: Not limited by traditional tool shapes, sizes and physical contact.
Fineness and complexity: Easily achieve extremely fine features (such as hair-thin fonts <1mm), complex geometric patterns, fine hollow patterns, internal slots, nested structures, etc.
Unlimited creativity: Provide designers with unprecedented creative freedom, and personalized customization and complex structural parts production become simple and efficient.
4. Stress-free and crack-free:
Non-contact nature: The laser beam works above the material and does not physically contact the acrylic.
Eliminate mechanical stress: Completely avoid the internal stress caused by tool extrusion and vibration in traditional mechanical processing (sawing, drilling, milling).
Eliminate the risk of cracking: Fundamentally solve the problems of microcracks, edge collapse and even overall cracking caused by processing stress.
Guarantee integrity: It is particularly conducive to processing thin plates, complex structural parts or stress-sensitive acrylic, ensuring the structural integrity and long-term stability of the finished product. (Note: Although the heat effect of laser cutting is extremely small and controllable, strictly speaking there is a very small heat-affected zone, but it is far from enough to cause acrylic cracking. Its stress-free advantage is mainly compared with mechanical processing)
Laser cutting technology has undisputedly established its ultimate position in the field of high-end acrylic processing with its micron-level precision, instantly perfect “flame polished” edges, unimaginable design freedom, and non-contact characteristics that completely eliminate processing stress.
How To Cut Circles Or Complex Shapes?
Cutting a perfect circle or complex non-linear shape is indeed a significant challenge for manual operators.
1. Limitations of DIY methods (such as jigsaws, handheld rotary tools):
- High control difficulty: When cutting curves with a jigsaw or a handheld rotary tool (such as a Dremel), extremely high hand stability and operating skills are required. It is very difficult to keep the tool perpendicular to the workpiece and accurately follow the marking line.
- Difficult to ensure edge quality: Even if the shape is barely cut out, the edge is usually jagged and burred, and it is difficult to achieve smoothness. For circles, it is difficult to avoid elliptical deformation or discontinuous edges.
- Reliance on experience and grinding: It often takes a lot of practice to obtain relatively acceptable results, and a lot of time must be invested in tedious grinding and filing to barely improve the edge smoothness. “Perfect” and “smooth” are almost impossible to achieve directly with hand tools alone.
2. The inherent advantages of laser cutting:
- Computer precision: The inherent advantage of laser cutting machines is that they are completely computer numerical control (CNC) controlled. It processes the geometric shapes in the design files (such as CAD files), whether simple straight lines, squares, or complex curves, circles or complex patterns, as paths formed by precise coordinate points.
- Consistency and perfection: The laser beam traces these digitally established courses untroubled by human hand shake or mechanical limitation of the instrument. Therefore, no basic difference in requirement for challenge and precision exists between cutting a perfect circle and cutting a normal square. Both can be executed by the laser with extremely high repeatable precision, and edges will normally be very smooth and clean (depending on material and setup).
- Ease of complex shapes: For very complex shapes with internal hollowing or very small details, laser cutting is essentially the only method that can be performed economically and accurately, and the cost barely increases with the complexity of the shape.
Hand tools (rotary tools, jig saws) have extremely difficult times maintaining accuracy and edge quality in control in cutting highly complex shapes, and the results are hugely dependent on operator skill and a lot of post-work. Laser cutting, having digital control, basically eliminates variations in difficulty in cutting geometric shapes themselves, and can cut an absolute circle or any elaborate design with unheard-of precision and accuracy, which is its highest value and non-replaceability. Laser cutting is ideal for cutting which needs to be precise, smooth, and detailed.
How To Prevent Cracking?
In DIY cutting, cracking is a frequent problem, mostly due to improper operation or wrong tool selection. The following are main ways to avoid cracking:
1. Common DIY cutting risks
- Not deep enough: If the pre-scribing depth is not adequate, the material’s stress distribution is non-uniform when breaking, which could easily result in uneven cracking.
- Asymmetric breaking force: Deviation of the direction of manual force or abrupt change of force could lead to edge cracking or concealed cracks.
- Incorrect saw blade selection: Employing a saw blade with an overly large pitch or extreme wear will exacerbate material tearing instead of smoothening cutting.
- Excessive feed speed: Local overheating as a result of high-speed friction, and microcracks are sure to form at locations having a high degree of thermal stress concentration, especially for brittle materials such as glass and acrylic.
2. Important preventive actions
- Optimize the marking process: Ensure the depth of marking is at least 1/3 of the material thickness, and use a guide tool for maintenance of linear accuracy.
- Control the breaking force: Use a slow and steady force technique, or use a clamp to hold the material to prevent human error.
- Choose the right saw blade: Choose a fine-toothed saw blade (e.g., a high TPI saw blade for cutting metal) depending on the hardness of the material, and keep the saw blade sharp.
- Optimize cutting conditions: Reduce the feed rate and use coolant (e.g., when cutting metal) in an attempt to reduce thermal stress build-up.
3. The ultimate fix: laser cutting
Laser cutting melts the material at high temperature by contact, without mechanical stress, and can completely remove microcracks. It is especially suitable for precision components or brittle material (e.g., ceramics, ultra-thin glass), with smooth and flawless cutting edges and a yield rate of 100%. However, it should be noted that it is costly and unsuitable for all materials (e.g., chlorine-containing materials like PVC will emit toxic gases).
For standard DIY, the cracking can be reduced by standardized operation; however, for precision-high requirements, laser cutting is the most reliable one.
Case : Custom PC case acrylic side panel
Customer requirements: One customer needed us to create a specialty acrylic side panel for his custom PC. Most noteworthy regarding this panel is its complex honeycomb-patterned hollow heat dissipation hole structure and refined company logo engraving, requiring extremely high processing accuracy and edge quality.
Limitations of DIY approach:
The customer initially tried applying conventional manual methods (e.g., scribing and sawing), but was confronted with insurmountable obstacles:
- Unable to handle complex curves: The sharp angles and curves of the honeycomb structure cannot be accurately achieved with hand tools at all.
- Severe material damage: Acrylic is very easy to melt and collapse at the fine honeycomb corners during sawing.
- Loss of fine details: The delicate lines of the company logo cannot be achieved by manual sawing at all.
- High post-processing costs: Even if the shape is barely cut out, a lot of manual grinding is required to repair burrs and collapse, and the effect is far from ideal and the efficiency is extremely low.
LS’s professional solutions:
- Convenient online starting point: Customers upload the designed CAD files to our online laser cutting service platform.
- Instant transparent quotation: Our system automatically analyzes the files and immediately generates an accurate Laser cutting price, which is efficient and transparent.
- High-precision manufacturing: With our professional laser cutting equipment, processing can be completed in minutes. The laser perfectly reproduces the complex honeycomb holes and fine logos, with smooth and flat edges, no melting or edge collapse, and meets the “install and use” quality standard.
- Delivery of perfect finished products: Customers directly receive high-quality Laser cutting parts that meet design requirements without any additional processing.
Core value :
This case clearly proves that for any acrylic cutting needs involving complex geometries (such as sharp angles and curves), fine details (such as logo lines) or requiring high-quality edges (no edge collapse and melting), the traditional DIY method is not only inefficient, but actually unworkable. Professional online Laser cutting services, such as those provided by LS, are the only viable and efficient solution to meet such complex, high-precision processing needs, ensuring that the finished product perfectly matches the design intent and saving a lot of time and effort.
FAQs
1. Can I cut acrylic with an ordinary utility knife or knife?
For very thin sheets (<2mm), you can try to cut acrylic with an ordinary utility knife or knife, but the efficiency is low and the effect is not good, and it is easy to cause rough or irregular edges; therefore, it is strongly recommended to use a special hook knife, which can provide higher cutting accuracy and efficiency, ensure smooth and neat cuts, especially suitable for thin plate operations, and avoid wasting materials and time.
2. Does laser cutting acrylic have a smell?
Yes, laser cutting of acrylic produces a special pungent smell, which is mainly caused by the chemicals released during the melting process of the material; to ensure safe operation and environmental friendliness, professional processing workshops are equipped with powerful ventilation systems and high-efficiency filtering equipment to quickly remove odors and harmful gases to prevent impacts on human health or the working environment.
3. Is the cost of laser cutting high?
For single or small batches of complex parts, the comprehensive cost of laser cutting is very competitive because it can achieve perfect cutting quality, high precision and eliminate the need for post-grinding or finishing processes, saving labor and time; you can get instant personalized quotes through our online platform to evaluate the cost advantages of different quantities and designs.
4. Are all types of acrylic suitable for laser cutting?
Yes, both cast acrylic and extruded acrylic are suitable for laser cutting with very good results; cast acrylic has smoother edges after cutting and is suitable for fine processing, while extruded acrylic is less expensive. Both can be efficiently processed under laser to meet various application needs.
Conclusion
After exploring various methods for cutting acrylic, the answer became clear: when you are looking for customized designs, flawless edges, complex shapes and professional quality, laser cutting technology is the undisputed best solution.
Granted, DIY methods may be able to cope with extremely simple tasks, but they are often accompanied by frustrating frustration, rough defects, material waste and unpredictable results. Cracking, burrs and imprecise cut lines are not just minor issues, they will directly destroy the value of your carefully conceived design.
Your time and creative ideas deserve the best way to achieve them. Instead of wasting energy and money on trial and error, buying inappropriate tools and dealing with failed products, it is better to go all out and choose professional laser cutting services.
Stop fighting cracked edges and rough handmade effects! Entrust your pursuit of precision and desire for perfection to LS.
Take action now:
👉 Upload your design files (CAD, DXF, AI, SVG, etc.) to LS’s smart quotation platform.
👉 Get a clear, transparent instant quote in seconds.
👉 Let LS use a beam of precise light to perfectly turn the custom acrylic design in your mind into a reality within your reach!
Choose LS, choose laser. Your custom acrylic masterpiece starts here.
 📞 Phone: +86 185 6675 9667
📧 Email:info@longshengmfg.com
🌐Website:https://www.longshengmfg.com/


I would like to express my thanks to you for rescuing me from this type of dilemma. Right after scouting through the world-wide-web and getting concepts which were not powerful, I assumed my entire life was done. Living without the presence of solutions to the difficulties you have solved through the write-up is a crucial case, as well as the kind which could have badly damaged my entire career if I hadn’t encountered your web site. Your main capability and kindness in taking care of every part was vital. I don’t know what I would have done if I had not encountered such a thing like this. It’s possible to now relish my future. Thanks so much for the skilled and result oriented help. I won’t be reluctant to endorse the blog to anyone who should receive guidelines on this problem.
Hey, you used to write fantastic, but the last several posts have been kinda boringK I miss your tremendous writings. Past few posts are just a bit out of track! come on!
Hello! First of all, thank you so much for your honest feedback; it’s truly invaluable to me. I also appreciate that you still remember my “previous excellent articles.” I’m sorry that the recent content has disappointed you. To help me improve, could you please tell me which article(s) or type of article(s) you found particularly engaging in the past, and which recent article(s) you found “boring”? Your specific feedback would be extremely helpful!
I like this post, enjoyed this one appreciate it for putting up. “We are punished by our sins, not for them.” by Elbert Hubbard.
Have you ever thought about including a little bit more than just your articles? I mean, what you say is valuable and everything. Nevertheless think of if you added some great graphics or video clips to give your posts more, “pop”! Your content is excellent but with images and clips, this blog could certainly be one of the most beneficial in its field. Amazing blog!